Install the CLI and check prerequisites
Before you install the CLI, make sure your host runs Node.js 22.13+ and a local Linux Docker Engine 28+ with Docker Compose v2. On macOS and Windows, install and start Docker Desktop. Windows must use Linux containers.
To install @sendtry/computer-mcp globally and check your host, run:
npm install -g @sendtry/computer-mcp
computer-mcp --version
computer-mcp doctor
computer-mcp doctor prints a JSON report and changes nothing. Continue when result is ok. If it reports blocked, fix the listed prerequisite, for example by starting Docker Desktop, and run computer-mcp doctor again. On macOS and Windows the CLI uses the desktop-linux Docker context, and on Linux it uses default. Pass --context to choose another local context.
Provision and start a dedicated computer
Each computer has its own computerId UUID, workspaceId UUID, Docker Compose project, persistent volume, and loopback console port. Ports start at 17670. By default, computer-mcp init puts the computer on an offline internal Docker network.
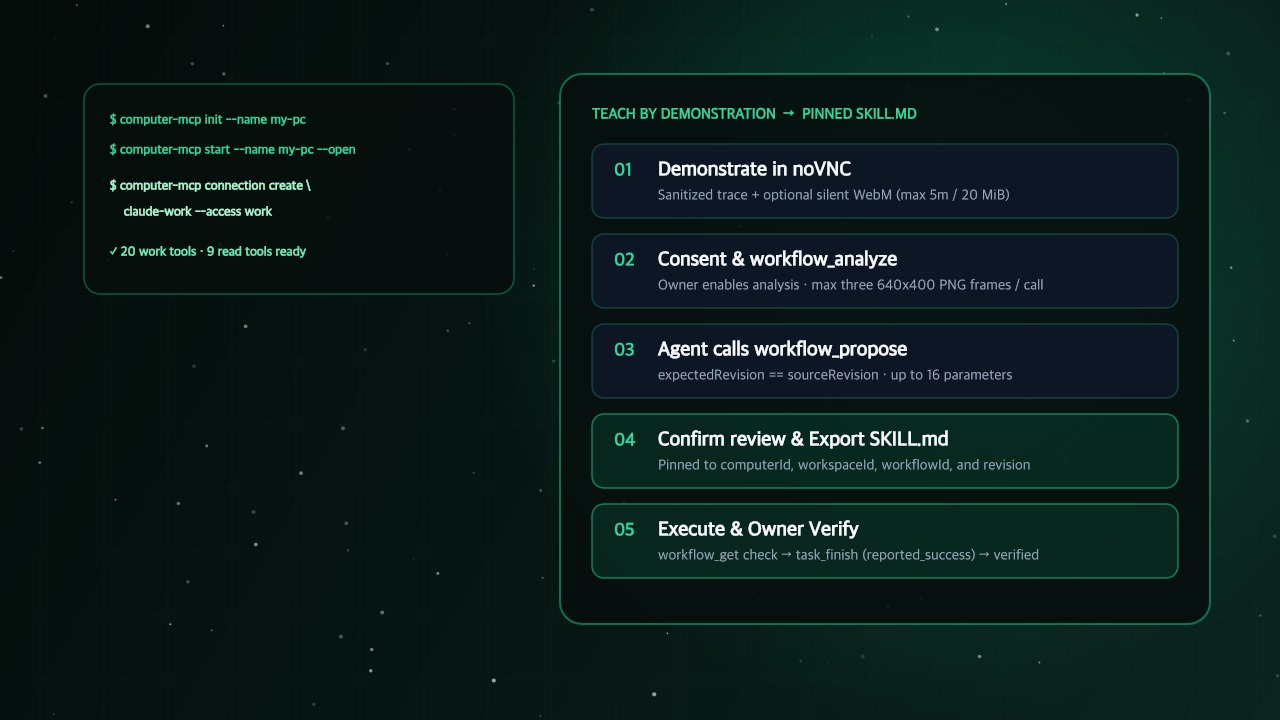
To create an offline computer named my-pc and open its owner console in your browser, run:
computer-mcp init --name my-pc
computer-mcp start --name my-pc --open
If the guest needs internet access, create a separate computer with computer-mcp init --name web-pc --network internet. Internet mode also reaches LAN and host services, so it is not an outbound firewall.
On first start, the CLI builds the guest image, starts the container, and prints the computer UUID, the workspace UUID, and the console URL. The first computer uses http://127.0.0.1:17670. --open then opens the owner console with a single-use link. If that link expires, run computer-mcp open --name my-pc. The console shows the live 1280x800 guest desktop in Screen, with Tasks, Teach & skills, Files, Terminal, Connect agent, Activity, and Computers in the sidebar.
Connect Claude Code, Codex CLI, Cursor, or Gemini
New computers disable legacy shared access, so each MCP client needs its own named grant. Create a work grant (20 tools) or a read grant (9 tools) with computer-mcp connection create. The command stores a credential hash in the runtime and writes the secret to a private host file (0600) under <catalog>/connections/<computerId>/<connectionId>.json. It prints credential-free configuration to standard output and the private file path to standard error.
Choose the command that matches your MCP client:
# Claude Code, Cursor, or Antigravity (mcpServers JSON)
computer-mcp connection create claude-work --name my-pc --access work --client generic

# Codex CLI (mcp_servers TOML table)
computer-mcp connection create codex-work --name my-pc --access work --client codex

# VS Code (servers JSON with type stdio)
computer-mcp connection create vscode-work --name my-pc --access work --client vscode

# Custom harness or SDK client (plain command and args)
computer-mcp connection create custom-work --name my-pc --access work --client stdio

# Read-only reviewer (9 inspection tools, no lease)
computer-mcp connection create reviewer-read --name my-pc --access read --client generic
For example, the --client generic command prints a pinned JSON entry like this one:
{
  "mcpServers": {
    "computer-my-pc-3b1f0c2a9d4e": {
      "command": "/opt/homebrew/bin/node",
      "args": [
        "/opt/homebrew/lib/node_modules/@sendtry/computer-mcp/src/cli.js",
        "mcp",
        "--connection",
        "/Users/you/.computer-mcp/connections/9f4c2e10-6b8a-4d31-9a12-7c0e5f2d8a1b/3b1f0c2a-9d4e-4c7a-8f21-5e6d7c8b9a0f.json"
      ]
    }
  }
}
Merge the entry into your agent project and keep its generated computer- key. Claude Code reads .mcp.json. Codex reads the TOML table from .codex/config.toml. Antigravity reads .agents/mcp_config.json. Cursor reads .cursor/mcp.json and also needs "type": "stdio" inside the entry. Approve the server in your client, then reconnect its MCP session.
To confirm that a grant authenticates and exposes the expected tools before you open your agent client, run computer-mcp check with the private file path that connection create printed:
computer-mcp check --connection "/Users/you/.computer-mcp/connections/<computerId>/<connectionId>.json"The check prints a JSON report and takes no lease. Expect result: ready. A work grant reports access: work and 20 tools, and a read grant reports access: read and 9 tools. A work state of needs-assignment is normal until you assign a task.
Install the sendtry-computer operator skill
The repository ships a general operator skill (skills/sendtry-computer/SKILL.md). It teaches coding agents the operating rules: call computer_info first, wrap assigned work in task_start and task_finish, prefer the files_* tools and terminal_run over GUI clicks for file and shell work, and confirm the reviewed workflow revision before running a taught skill.
To install the skill into your agent project, run the command for your harness. Replace claude-code with codex or cursor as needed:
npx --yes skills@1.7.4 add bujosa/computer-mcp --skill sendtry-computer --agent claude-code --copyClaude Code loads the skill from .claude/skills/sendtry-computer/, and Codex and Cursor load it from .agents/skills/sendtry-computer/. For Antigravity, copy the skills/sendtry-computer/ folder into .agents/skills/ yourself. Installing the skill grants no access. Ask your agent to load sendtry-computer and confirm that it reads the skill and discovers the MCP tools.
Teach a reusable task by demonstration
Instead of hand-coding selectors for browser or desktop workflows, you demonstrate a task once in noVNC, and a connected vision-capable work agent drafts a parameterized skill for your review.
1. Record a demonstration
- In the owner console, open Screen and choose Take control. The console gives your browser the exclusive control lease and the interactive noVNC stream.
- Choose Practice task to open the offline practice notes page in the guest Chromium browser.
- Open Teach & skills, name the task
Save a project note, and set the goal to saving the supplied project and next step. Turn on the optional guest video if you want visual analysis. Each clip is capped at 5 minutes and 20 MiB. Choose Start recording. - In Screen, fill Project name and Next step with sample values, then choose Save note.
- Choose Finish demonstration. The runtime saves the action trace without your typed values and stores the raw WebM video in
/data/control/videosunderUID 0.
2. Allow analysis of sampled frames
By default, MCP clients cannot read demonstration media. To let your work agent inspect the recording:
- In Teach & skills, select the
Save a project noterecording and choose Allow agent analysis. This lets every work grant on this computer sample frames from this workflow, and your model provider receives what the frames show. - Choose Copy analysis request and paste the request into your connected
workagent. - The agent calls
workflow_analyzewith the workflowid. The runtime pipes the video through theUID 1001frame sampler (frames.js) and returns the trace plus up to three640x400PNG frames per call, each capped at 512 KiB, under an 8-second deadline.
3. Review the agent's proposal
After it inspects the trace and frames, the agent calls workflow_propose with expectedRevision set to the sourceRevision that the analysis returned. Revisions are UUIDs. The proposal includes a procedure, an expectedResult, uncertainties, and up to 16 named parameters. Parameters carry only a name and a description, such as project_name and next_step, never stored values.
{
  "id": "6f2d9c4e-1a7b-4e3f-9c8d-2b5a0e7f1c36",
  "expectedRevision": "c41e8a2f-7d3b-4f90-8a6e-1b2c3d4e5f60",
  "procedure": "1. Open the practice note page in the guest browser if it is not visible.\n2. Fill #project with project_name.\n3. Fill #note with next_step.\n4. Click #save-note once, reload the page, and confirm both values are still shown.",
  "expectedResult": "After a reload, the practice page shows the supplied project_name and next_step.",
  "uncertainties": "The last sampled frame precedes the final reload, so the frames alone do not prove the note persisted.",
  "parameters": [
    {
      "name": "project_name",
      "description": "Project title to write into the #project field."
    },
    {
      "name": "next_step",
      "description": "Status note to write into the #note field."
    }
  ]
}
When workflow_propose succeeds, the workflow holds a pending draft and reports reviewed: false. An agent cannot reuse it until you review it.
4. Confirm the review and export SKILL.md
An agent cannot run a proposed workflow as an approved skill until you review and confirm it:
- In Teach & skills, choose Review updated proposal to load the agent draft.
- Edit the procedure, parameter descriptions, and expected result so they match how the guest application behaves. The practice page stores only one current note, so saving a new note replaces the old one.
- Choose Confirm review. The runtime publishes the reviewed method under a new revision and reports
reviewed: true. - Choose Export SKILL.md to save a skill file pinned to your
computerId,workspaceId, workflow UUID, and reviewed revision. Save it in the skill folder that the console names.
5. Run the skill with new inputs and verify it
When the workflow shows status: ready and reviewed: true, test it with fresh parameter values and check the result yourself:
- In Teach & skills, choose Try with new inputs and enter new values for
project_nameandnext_step. Select Do the reviewed task, choose your namedworkconnection (for example,claude-work), and save and copy the assignment. - In Screen, choose Release so the agent can take the 90-second control lease.
- Paste the copied request into your connected
workagent. - The agent calls
task_start, waits forworkflow_getto confirm thatstatusisready,reviewedistrue, and the revision matches, runs the browser steps under its lease, and callstask_finishwith its outcome and a summary. - Open Tasks. If the agent reported success, the attempt shows
reported_success, and owner verification is still empty. - Reload the practice page in Screen and review the tool calls in Activity. Under Your check, choose Mark checked if the saved note matches your new inputs, or Mark rejected and explain what differs.